Friday, May 30, 2014
DIY Home Project: Garage Floor Painting
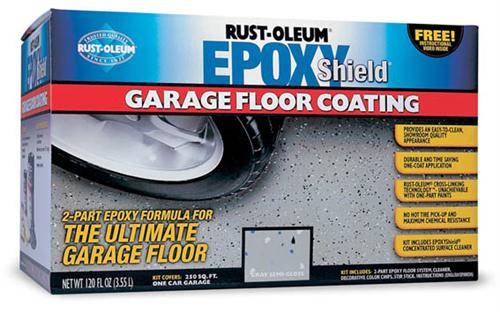
Today were looking at painting the garage floor to hide those project stains and to make the garage look new and clean again, great appeal to potential buyers.
 Using the Rust-Oleum Epoxy Shield Garage Floor Coating kit you can easily make you garage floor look brand new again! The kit comes with complete easy to follow instructions as well as an instructional DVD, you can view HERE how one homeowner took this project on by herself and it looks amazing!

Tuesday, May 27, 2014
DIY Home Project: Garden Irrigation
This would make watering your flower beds or garden so much easier. By using a mix of inexpensive parts you would build your own underground irrigation system that runs underneath your flower beds or garden. Excellent idea!
Thursday, May 22, 2014
DIY Home Project: Grow Your Own Teepee
This would look amazing and would be fun for the kids to play in, or even the dog to lay in on a hot day once complete. Also it would be relatively quick and cheap to complete. The longest part of the project is waiting for the ivy to grow up the frame! Would look amazing!
Monday, May 19, 2014
DIY Home Project: Custom Walkway
This is a cheap way to get that great paver stone walkway that the local companies want to charge a fortune for. And for the less creative you don't have to worry about arranging the stones so they look nice, here you get the "stencil" and just add concrete and make your own stones! Excellent idea that looks great!
Friday, May 16, 2014
DIY Home Project: Backyard Shed
Today were looking at a backyard cabin, shed, man cave, really whatever you want to make it into and call it. Using this design it is both a time and money saver as this allows you to limit the amount of expensive materials required as well as allows you to assemble it completely over a weekend.
Tuesday, May 13, 2014
DIY Home Project: Decorative Hidden Cooler
A great decorative cooler for the patio is always a must, and it looks so much better than the plain plastic. Very creative and imaginative! This would be recycling an old cooler and the wood frame could be made from old scrap wood, even from disassembled wood pallets.
Friday, May 9, 2014
DIY Home Project: Ombré Wall
This week we are looking at a painters touch that creates an amazing effect, an ombré wall!
To get started you will need to choose three colors in a light, medium, and darker shade that are from the same color family, the easiest way is to pick from one paint swatch. You are also going to need painters tape, a paint roller, paint brushes and a paint tray.
Step 1. Trim the wall with painters tape and paint the entire wall the light color chosen.
Step 2. Paint a bottom section the darkest color chosen.
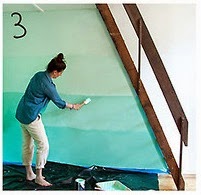
Step 3. Mix in a paint tray equal parts of the darkest color and medium color and paint a section directly above the section painted with the darkest color, next, paint the section above that with only the medium color.
Step 4. Using a small paintbrush, blend the colors together until the areas and lines bleed together, you may need to touch up with mixed paint as you blend.
After blending you should see an amazing ombré effect has taken place! This is a great way to add some extra character to any wall in your home or even an entire room painted this way!
Tuesday, May 6, 2014
DIY Home Project: Bathroom Tile Rescue
We have all walked into a house that seems a little dated and thought well it isn't too bad, that is until you walked into the bathroom and saw the crazy colored tiles. Its like taking a time machine back into the 80s...
With our project today you learn how you can save money and time while making your bathroom look great by painting those dated tiles instead of replacing them.
Step 1. Throughly scrub the tiles and grout with a quality cleaning product or Sugar Soap. If there are any areas with mold or mildew they will need to be cleaned with a solution of bleach and water.
Note: When scrubbing grout a toothbrush works great!
Step 2. Paint the grouted area, if you don't want to paint the grout use tape to cover it so it will not be painted over. A medium paint brush works best when painting the grouted area.
Step 3. Paint tile surface, depending on the tile you may want to use 120 grit sandpaper to lightly sand the tile surface to improve the paint adhesion, just remember to clean thoroughly before painting. A small paint roller works well.
Note: painting side to side and top to bottom will ensure even coverage over the wall, also if you need more that one coat make sure to wait the recommended drying time.
Friday, May 2, 2014
DIY Home Project: Tire Pond
Today we are looking at making a great decorative pond out of an old tractor tire.
This really is creative as you can almost always find these at a flea market, after giving it some thought I really don't see why you couldn't use an old plastic kiddie pool if you cant find a large enough tire. A quick and easy yard decoration that is sure to impress!
This really is creative as you can almost always find these at a flea market, after giving it some thought I really don't see why you couldn't use an old plastic kiddie pool if you cant find a large enough tire. A quick and easy yard decoration that is sure to impress!
Subscribe to:
Comments (Atom)


